Interface and shortcuts
Where each piece of Plare sits, what each one shows and which key triggers it.
Step by step
1. Open Plare and take in the whole window first.
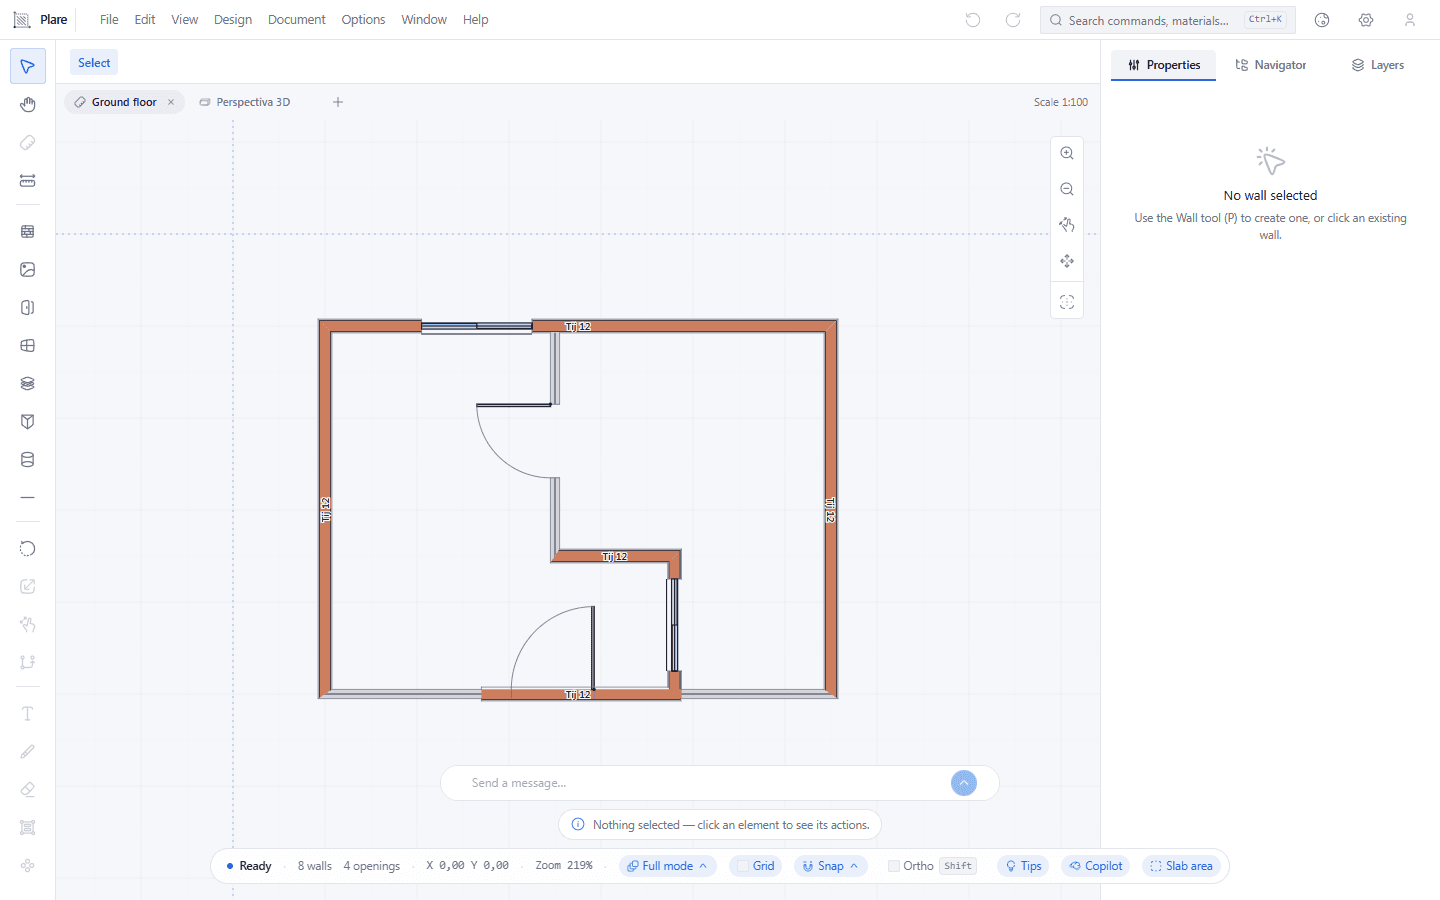
The menu at the top, the tool rail down the left, the drawing area in the middle with the sample house, the Properties panel on the right and the status bar at the bottom. The panel comes empty: nothing is selected yet.
2. Click a wall to see where each thing appears.
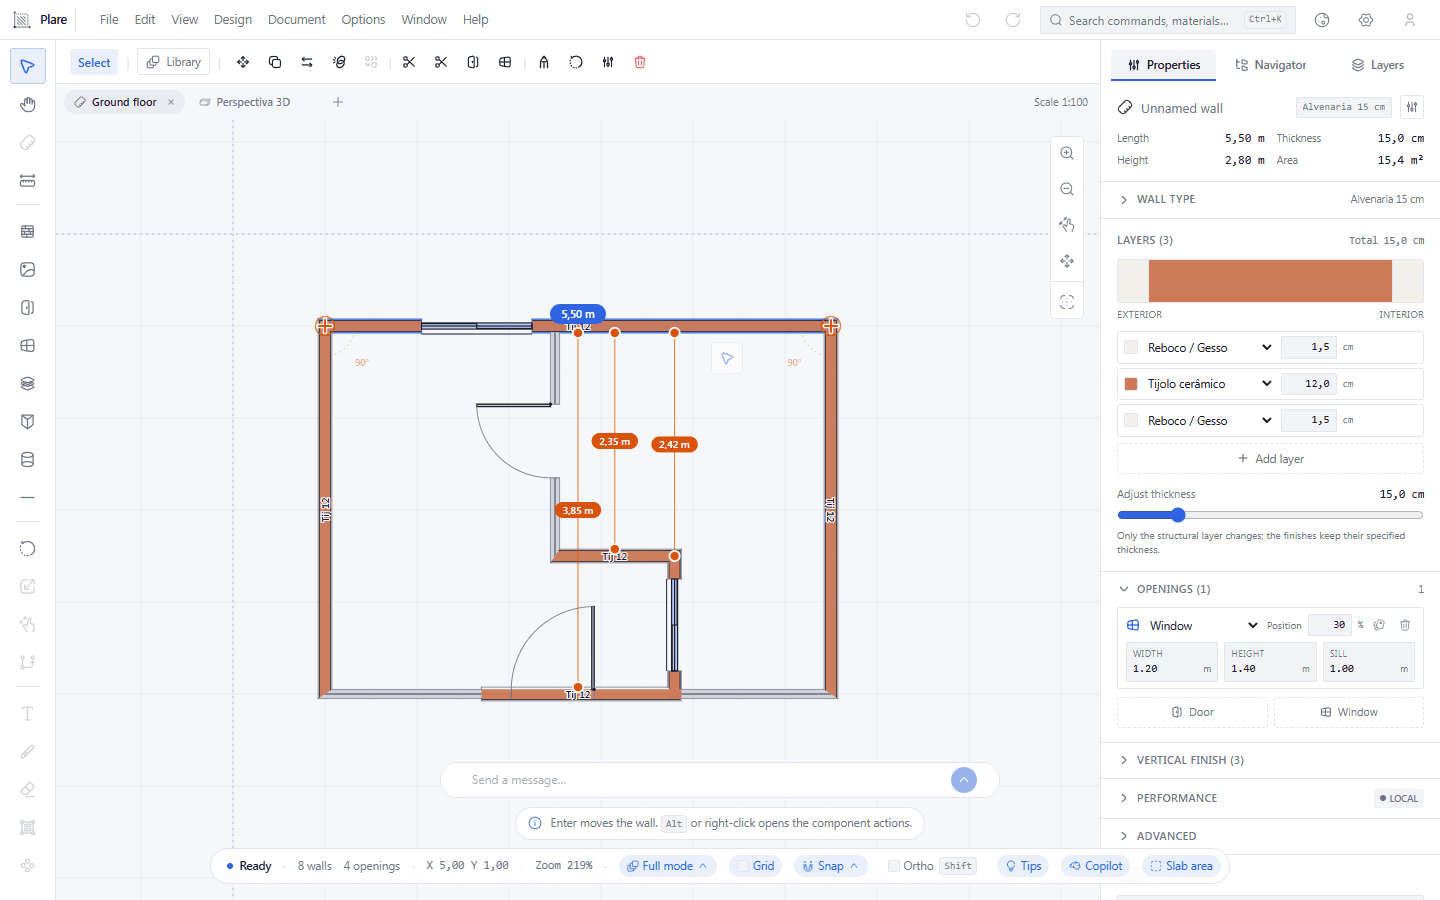
The top wall is highlighted in blue, grips appear on its two ends, the bar under the menu starts offering the selection's actions, and Properties fills up: length, height, area, layers and openings. This is where the panel stops being decorative.
3. Switch between plan and 3D with the 2 and 3 keys, or from the tabs at the top of the drawing area.
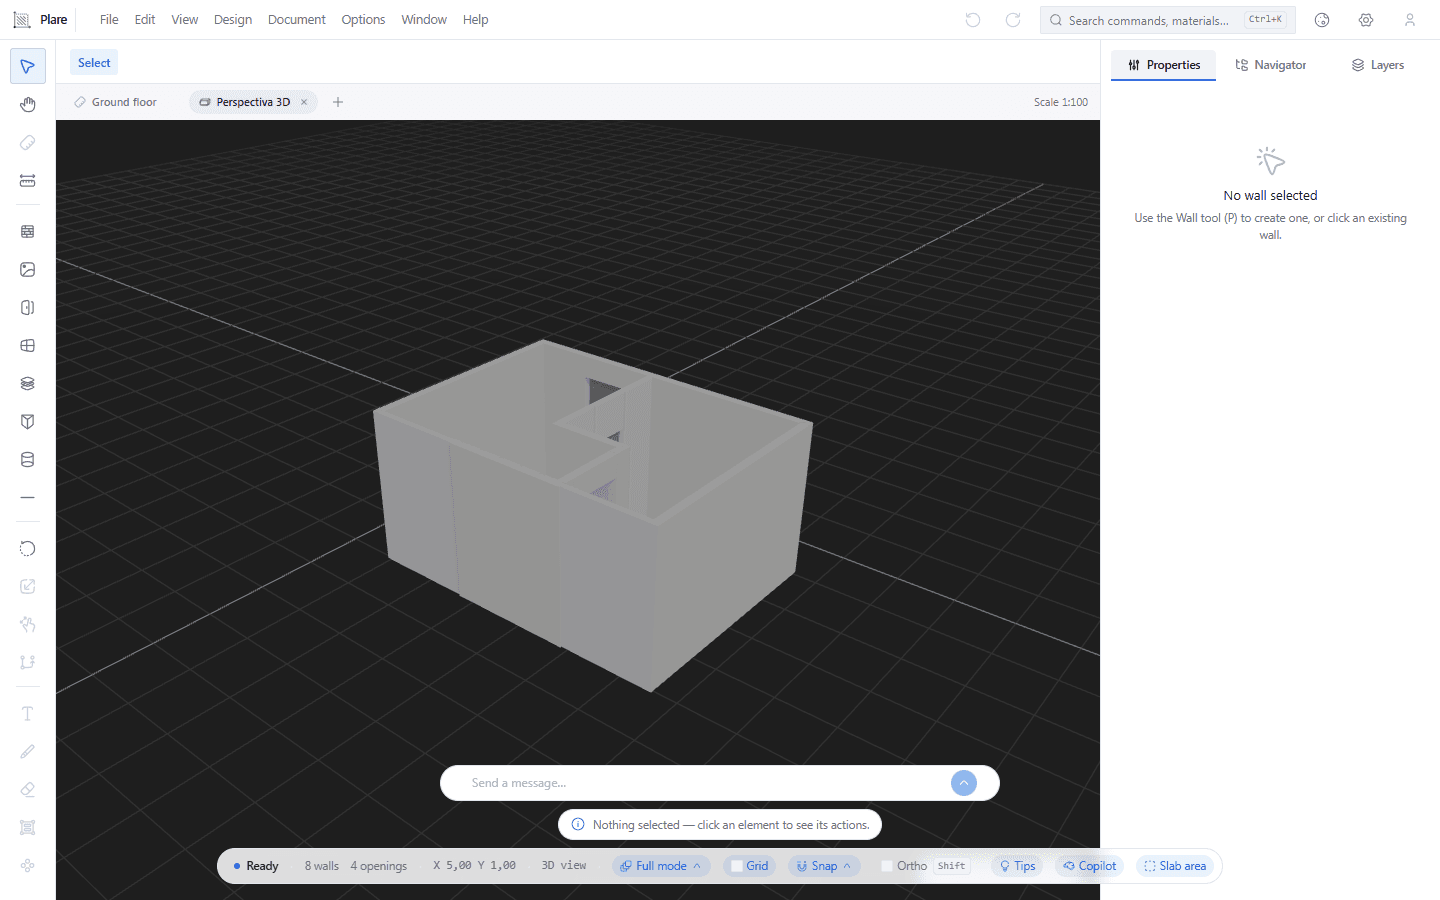
The same house raised into volume, with the 3D tab open beside the plan tab and the dark 3D background behind it. The status bar says which view you are in — the 3D one. The tabs are views, not files, and that is why they matter.
4. Need the room? Enter focus mode.
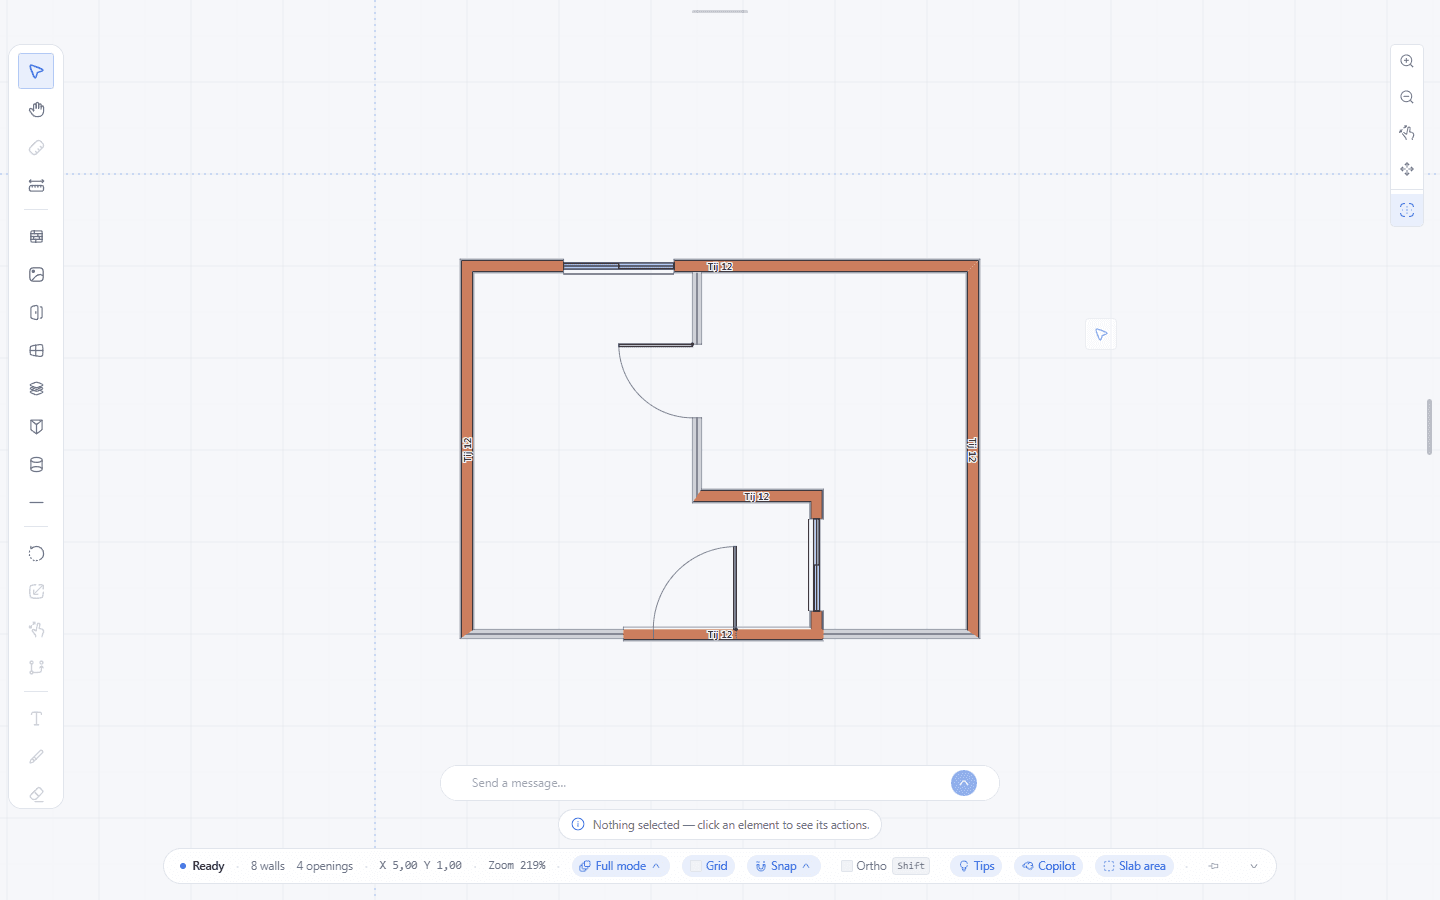
The menu at the top and the right panel drop away, and what is left is the tool rail, the canvas, the zoom strip and the status bar. It is the Ctrl+Shift+F the Screen tab of Preferences talks about, and the panels come back when you leave it.
Worth knowing
- One click on a tool turns it off again — that is how you leave a tool that does not chain. The ones that draw in sequence (wall, door, window, slab, roof, column, beam, dimension, image) ask for Esc.
- The mouse wheel pans the view in plan and zooms in 3D. To zoom in in plan: pinch, Ctrl+Shift+=, or the zoom controls in the corner.
- Shift+wheel pans horizontally. In 3D, the middle button orbits and the right button pans.
- The right panel is resized by its left edge, and double-clicking that edge returns it to the default width (340 px). The width is saved.
- Hold the snap button for 350 ms — or click the arrow next to it — to choose between the nine snap types. Only seven work today: faces and outlines are on the list, but they do not capture yet.
- There is no context menu with buttons. What exists is the floating menu, which appears near the cursor when you select geometry and is triggered with Alt (or with the right button over the drawing).
- The mouse right button pans the view in 3D, which is why it only opens the floating menu when you use it over a wall, door, window, slab, column, beam or dimension.
- There are no rulers on the edges. The cursor coordinates show in the status bar, and the length of the line you are drawing shows inside the tool itself.
- Space switches the wall reference line — axis, outer face, inner face — while you draw, and does the same to the selected walls. Panning the view is H.
- The history keeps the last 60 actions. Older than that does not come back.
- The grid ships turned off, and grid snap turned on: the cursor jumps even when you cannot see the lines.
Related tools
Related guides
The screen from the outside
Five zones, and each one has an owner:
Menu bar — File, Edit, View, Design, Document, Options, Window, Help. The grey items marked "Coming soon" are promises, not installation errors: importing DWG/DXF, exporting the plan as an image, the wall types editor and the material libraries exist as menus before they exist as behaviour. The dialogs, yes, are open — and they are the ones the help documents.
Tool rail — it runs down the left edge, vertical, and a thin divider separates the four blocks: point and measure, create, modify, annotate and organize. Every icon names itself on hover, and the greyed ones say the tool is still on the way.
Drawing area — it is most of the screen. At its top sit the options bar, which holds the tool you are holding and its fields (for the wall tool: type, thickness, height and reference line), and just below it the tabs — views, not files: a plan tab belongs to one storey, and a 3D tab shows the whole building.
Right panel — Properties, Navigator and Layers, in that order, and one at a time.
Status bar — it closes the screen at the bottom, and it is what tells you what is switched on (Grid, Snap, Ortho), where the cursor stands in coordinates, and how many elements the project holds.
The two ways to reach a command
Every tool has two accesses, and neither of them is more correct than the other: the key on the tool rail, and the name in the Ctrl+K search. The search also finds the menu commands that have an action wired to them, and the materials.
The tool rail shortcut is a single letter, with no modifier, and each letter belongs to one tool — an honest list of the letters is the rail itself, since the bubble beside every icon carries the name and the key together.
The three modes of the right panel
Properties shows the fields of what is selected, or a guide with the ten tools and the four material surfaces when nothing is selected. The tabs inside it depend on what you chose: a wall brings geometry and layers, an opening brings dimensions and position, and with more than one thing selected the panel stays on the general one.
Navigator is the tree: project, storeys with height and level, plan views and 3D. The column beside it shows the level and the height of the chosen storey, and this is where a storey is created, duplicated, renamed and deleted.
Layers is a flat list, with one card per layer: one dot per visibility state, the name as editable text, the element counter and three switches (visible, locked, printable). The management button opens the window where layers are created, renamed, reordered and deleted.
Tabs, views and storeys
The plus sign next to the tabs offers two things: Floor plan and 3D perspective. Storey views are born in the Navigator, and that is where you choose which one is active.
A tab closes on the ×, on double-click, on the mouse middle button or with Ctrl+W, and the last tab does not close. There is no need to save: everything is written to the file as you work.
The floating menu
It is called the floating menu and it is this interface's context menu: it appears near the cursor when you select components, with text actions and no icons — the group's, the recently used materials', and the ones specific to the type (split wall, flip the opening, change the thickness).
Three things are worth knowing about it:
- The modifier that makes it follow the cursor is Alt, and it is changed in Preferences, on the Shortcuts tab.
- The Keep open button holds the bar in place; unpinned, it disappears with a click outside.
- It is also called by the right button over a wall, door, window, slab, column, beam or dimension — the only case in which the right button does not pan the view.
The status bar
Six indicators, on the left, and every one of them that does not open a menu reacts to a click the same way as its button on the tool rail:
| Indicator | What it does |
|---|---|
| Drawing detail | Three states — Full mode, Core only, No finish. |
| Grid | Turns the grid on and off; hold it for 350 ms to choose lines or dots. |
| Snap | Turns snap on and off; hold it for 350 ms to choose the types. |
| Ortho | Locks the angles at 15 degrees; Shift does the same in any tool. |
| Tips | Turns the tip line on and off. |
| Copilot | Turns the Copilot dock on and off. Off, it leaves the interface. |
Before them the bar only reads, with no button: the cursor coordinates and the zoom (which says "3D view" when you are in it). The bar does not repeat the active tool — the tool rail and the tip line already say it.
Two things the bar shows have no button on it: the counts of walls, openings and rooms, and the slab area and room area labels. All three choices live in Preferences — the counts on the General tab, the areas on the Screen tab. An individual slab or room can still override the preference in the properties panel.
The tip line is part of the status bar and opens with it. The Tips indicator switches both off; right-clicking the bar itself does the same, because the line closes that way too.
What happens when you press Esc
Esc is not a single "cancel" button; it walks a queue, and the first thing it finds is the thing that goes. In this order: closing a dialog of its own (including Preferences), discarding a number being edited, cancelling the active tool, closing the floating menu, closing the Copilot conversation, clearing the selection.
Which is why an extra Esc, with the drawing already cleared, has no effect at all — and why, in the middle of a gesture, Esc is always safe.
Keys worth memorising
- Enter confirms the number you are typing, and with a wall selected it moves the whole wall.
- Tab and Shift+Tab flip the side and the face of a selected door or window.
- Delete deletes the selection.
- 2 and 3 switch between the storey's plan and 3D; the other digit keys land on the tools that carry that digit in their label.
- Ctrl+Shift+1 fits the view, Ctrl+Shift+0 resets the zoom, Ctrl+Shift+P opens and closes the right panel, Ctrl+Shift+F enters focus mode (with the panel pinning itself).
- Ctrl+Shift+A repeats the last tool.
- Ctrl+Z undoes, Ctrl+Shift+Z and Ctrl+Y redo.
- Ctrl+S saves, Ctrl+O opens, Ctrl+Shift+S saves as, Ctrl+N new project.
- Ctrl+K searches commands, Ctrl+, opens Preferences.
- Ctrl+R turns the visibility of the annotation layers on and off.
- Ctrl+1 to Ctrl+9 select the matching layer, and Shift with one of those keys switches its visibility.
What does not exist yet
Because a short list is more useful than hunting blind: there is no working DWG/DXF import or export, there is no export of the plan as an image, there are no configurable units or scale (the units are the construction's, in metres), there are no rulers on the edges, there is no free rotation in plan (the angle is orthogonal or typed), and there is no right-click context menu outside the geometry.
What exists to make up for it is the Ctrl+K search, the floating menu and this guide.